

Introduction The growing popularity of 3D printing has made it easier than ever to repair, customize, and enhance everyday tools. One such practical
Introduction
The growing popularity of 3D printing has made it easier than ever to repair, customize, and enhance everyday tools. One such practical application is creating a husky ratcheting screwdriver end cap 3d model. Whether your original end cap is damaged, lost, or you simply want to upgrade it, a 3D printed replacement offers a cost-effective and customizable solution. We will explore everything you need to know about designing, printing, and choosing the right materials for a Husky ratcheting screwdriver end cap 3d model, along with expert tips to ensure durability and performance.
Understanding the Husky Ratcheting Screwdriver End Cap
The end cap of a ratcheting screwdriver plays an important role in both functionality and comfort. It typically acts as a rotating support point, allowing users to apply pressure while turning the screwdriver. A well-designed husky ratcheting screwdriver end cap 3d model ensures smooth rotation and a comfortable grip during use. Since this component experiences frequent movement and pressure, it must be durable and precisely fitted. This is why careful design and material selection are essential when creating a 3D model for this part.
Why Use a 3D Model for Replacement?
Creating a husky ratcheting screwdriver end cap 3d model offers several advantages over purchasing a replacement. First, it is more affordable, especially if you already own a 3D printer. Second, it allows for customization, enabling you to modify the design according to your preferences. Additionally, 3D printing gives you the flexibility to experiment with different materials and designs. This means you can improve the original design by enhancing grip, durability, or aesthetics. For DIY enthusiasts and makers, this is a perfect opportunity to combine creativity with functionality.
Key Design Considerations
Designing a functional Husky ratcheting screwdriver end cap 3d model requires attention to detail. One of the most important factors is accurate measurement. The dimensions must match the original screwdriver perfectly to ensure a secure fit. Another important aspect is the internal structure. The end cap should include grooves or locking mechanisms that align with the screwdriver’s internal components.
Additionally, the outer surface should be designed for comfort, with textures or ridges to improve grip. Finally, tolerance levels must be carefully adjusted. A design that is too tight may not fit, while one that is too loose may not function properly. Testing and refining your design is crucial for achieving the best results.
Best Materials for 3D Printing
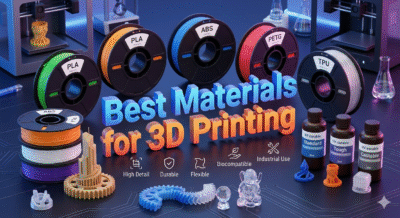
Choosing the right material is essential for a durable husky ratcheting screwdriver end cap 3d model. Different materials offer varying levels of strength, flexibility, and heat resistance.
PLA (Polylactic Acid) is a popular choice for beginners due to its ease of use and affordability. However, it may not be the best option for high-stress applications.
ABS (Acrylonitrile Butadiene Styrene) is stronger and more heat-resistant, making it suitable for functional parts like screwdriver end caps. It can withstand more wear and tear compared to PLA.
PETG (Polyethylene Terephthalate Glycol) offers a balance between strength and flexibility. It is durable, impact-resistant, and easier to print than ABS, making it a great option for this type of project.
For maximum durability, some users may also consider advanced materials like nylon, which provides excellent strength and wear resistance.
3D Printing Settings for Best Results
To achieve a high-quality, husky ratcheting screwdriver end cap 3d model, proper printer settings are crucial. Start by using a layer height of 0.1 to 0.2 mm for better detail and smoother surfaces. Infill density should be set between 50% and 100% to ensure strength and durability. A higher infill provides better resistance to pressure and impact. Print speed should be moderate to maintain accuracy, especially for small and detailed components. Additionally, using supports may be necessary depending on the complexity of your design. Temperature settings should be adjusted according to the material used. For example, PLA typically prints at lower temperatures, while ABS and PETG require higher heat.
Post-Processing and Finishing
After printing your Husky ratcheting screwdriver end cap 3d model, post-processing can improve both appearance and performance. Sanding the surface helps remove rough edges and creates a smoother finish. You can also apply coatings or finishes to enhance durability and aesthetics. For example, adding a rubberized coating can improve grip and comfort. Proper finishing ensures that your printed part looks professional and functions effectively.
Common Challenges and Solutions
While creating a husky ratcheting screwdriver end cap 3d model, you may encounter some challenges. One common issue is a poor fit due to incorrect measurements. To solve this, double-check your dimensions and make small adjustments during testing. Another challenge is material weakness. If your printed part breaks easily, consider using a stronger material like PETG or ABS. Adjusting infill density and wall thickness can also improve strength. Warping and printing errors may occur, especially with materials like ABS. Using a heated bed and proper adhesion techniques can help prevent these issues.
Benefits of 3D Printing Tool Components
3D printing tool components, like a husky ratcheting screwdriver end cap 3d model, offer numerous benefits. It reduces waste by allowing you to repair tools instead of replacing them entirely. It also saves money and provides a sense of accomplishment. Moreover, it encourages innovation and customization. You can experiment with different designs and create improved versions of existing tools. This makes 3D printing a valuable skill for both hobbyists and professionals.
Conclusion
In conclusion, creating a husky ratcheting screwdriver end cap 3d model is a practical and rewarding project for anyone interested in 3D printing. By understanding design principles, choosing the right materials, and optimizing printing settings, you can produce a durable and functional replacement part. This process not only extends the lifespan of your tools but also enables customization and improvement. With the right approach, 3D printing can transform simple repairs into creative and innovative solutions.
FAQs
1. What is a Husky ratcheting screwdriver end cap 3d model?
It is a digital design used to 3D print a replacement end cap for a Husky ratcheting screwdriver.
2. Which material is best for printing the end cap?
PETG and ABS are recommended for durability, while PLA can be used for basic prototypes.
3. Can I customize the design?
Yes, you can modify the Husky ratcheting screwdriver end cap 3d model to improve grip or fit.
4. Why is my printed part not fitting properly?
This may be due to incorrect measurements or tolerance settings. Adjust your design and reprint.
5. Is 3D printing tool parts reliable?
Yes, with the right materials and settings, 3D printed parts can be strong and long-lasting.
COMMENTS